AnimA ARPG adalah permainan peran aksi yang dikembangkan oleh Exilium Games.
Dirilis pada tahun 2019 untuk platform mobile, permainan ini menawarkan pengalaman bermain yang mengasyikkan dengan grafis yang memukau dan gameplay yang menantang.
Cerita
AnimA ARPG mengambil pemain ke dunia fantasi gelap yang dipenuhi dengan bahaya dan misteri.
Pemain memerankan seorang pahlawan yang harus melawan gelombang monster dan kejahatan yang mengancam dunia mereka.
Kemampuannya untuk dimainkan secara offline juga membuatnya populer di kalangan pemain yang ingin merasakan petualangan di mana saja dan kapan saja.
Cerita berkembang melalui serangkaian misi dan pencarian yang membawa pemain melintasi berbagai lokasi yang penuh dengan rahasia dan bahaya.
Gameplay
Gameplay AnimA ARPG didasarkan pada aksi real-time yang cepat dan pertarungan yang menantang.
Kemampuannya untuk dimainkan secara offline juga membuatnya populer di kalangan pemain.
yang ingin merasakan petualangan di mana saja dan kapan saja.
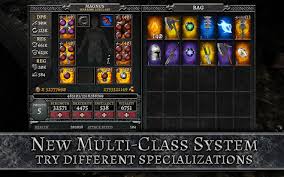
Pemain dapat memilih dari berbagai kelas karakter, masing-masing dengan gaya bermain dan keterampilan unik mereka sendiri.
Sementara itu, efek suara yang memikat memberikan atmosfer yang tepat untuk petualangan yang epik.
Sementara itu, efek suara yang memikat memberikan atmosfer yang tepat untuk petualangan yang epik.
Mereka akan berkeliling dari tempat ke tempat, menjelajahi kota-kota dan dungeon-dungeon yang berbahaya.
sambil mengumpulkan barang-barang, melawan musuh-musuh yang kuat, dan meningkatkan kekuatan karakter mereka.
Sistem pertarungan yang dinamis dan responsif membuat setiap pertarungan menjadi tantangan yang menyenangkan.
Grafis dan Suara
Grafis dalam AnimA ARPG menampilkan desain seni yang indah dan atmosfer yang gelap.
Lingkungan yang detail dan karakter yang dirancang dengan baik menambah kedalaman ke dunia permainan.
Kemampuannya untuk dimainkan secara offline juga membuatnya populer di kalangan pemain yang ingin merasakan petualangan di mana saja dan kapan saja.
Sementara itu, efek suara yang memikat memberikan atmosfer yang tepat untuk petualangan yang epik.
Lingkungan yang detail dan karakter yang dirancang dengan baik menambah kedalaman ke dunia permainan.
Sementara itu, efek suara yang memikat memberikan atmosfer yang tepat untuk petualangan yang epik.
Penerimaan dan Komunitas
AnimA ARPG telah mendapatkan pujian dari para penggemar RPG mobile atas gameplay yang adiktif dan grafis yang memukau.
Permainan ini memiliki komunitas yang aktif, dengan pembaruan reguler dan acara khusus yang diselenggarakan oleh pengembang untuk menjaga para pemain terlibat.
Kemampuannya untuk dimainkan secara offline juga membuatnya populer di kalangan pemain yang ingin merasakan petualangan di mana saja dan kapan saja.
AnimA ARPG adalah permainan RPG aksi yang menghibur dan menantang, dengan grafis yang memukau dan gameplay yang adiktif.
Bagi para penggemar genre ini, AnimA ARPG adalah pilihan yang sempurna untuk menghabiskan waktu luang mereka di perangkat mobile mereka.
Kemampuannya untuk dimainkan secara offline juga membuatnya populer di kalangan pemain yang ingin merasakan petualangan di mana saja dan kapan saja.